Bookeye Scanner Workflow
Capture Specs
Resolution: 400 ppi Format: PNG (lossless) Access: JPG / PDF Color: sRGB, 48-bit
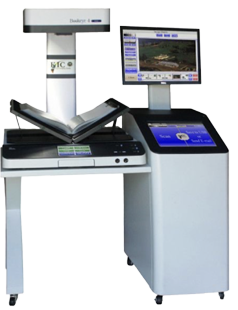
Follow these steps on the Bookeye scanner to produce preservation-quality images (PNG) for later PDF construction in ABBYY FineReader.
Scan quality comes first
Prioritize quality over speed. Each scan should be clear and legible, straight, fully captured with no cropped-off edges, and evenly lit. If a scan is blurry, distorted, too dark, skewed, or missing part of the item, delete it and scan again before moving on.
Use the angled cradle for books and other bound volumes. Lay large-format items flat on the scanner bed.
If the scanner is not capturing the item correctly, try one of these adjustments:
- change the material type to Newspaper, Art, One Photo, or another option that better matches the item
- move the item to a different position on the scanner bed; even a small adjustment, such as moving it about an inch up or down, can help the scanner detect it correctly
- if it still will not scan correctly, rotate the item and scan again; straighten the image later during processing
- place a folder or blank sheet under the item to create stronger edge contrast if the scanner is having trouble detecting the object boundaries
Steps
- Insert USB drive.
- Select Material. Default is Document. If you run into issues, try One Photo or other settings.
- Set resolution to 400 DPI (Preservation Quality).
- Scan materials. Delete unclear or distorted images and adjust settings as needed.
- Export PNG to USB. Under Send Your Scans, choose Export Option: USB and File Format: PNG. PNG is our preferred master capture format—see rationale below.
- End Session and delete all images on the bookscanner when prompted. See End Session Notes for why this creates a new folder and why DPI must be reset for the next batch.
- Rename the scan folder.
Rename the folder created on the USB drive so it matches the physical folder being scanned. Use
b000for the box number andf000for the folder number, along with a short folder title. See the File/Folder Naming Guidelines for the full naming standard. Example folder name:ca-002-006_b003-f012_short-title - Add a
README.txtfile to the scan folder. Include enough information to identify the scans later, such as the collection name, box name, full folder name, who scanned the folder, and the scan date. Use the README.txt Template below. - Copy the completed scan folder to DPSTORAGE.
Copy the folder from the USB drive to the DPSTORAGE network directory at
V:\librarydata\archives_store\dplab_storage\. Place it inside a parent folder for the collection or series being scanned.
End Session Notes
Why end the session?
Ending the session creates a new folder on the USB drive containing all scanned items—useful for keeping each batch organized.
Don’t forget to reset DPI
Ending the session resets settings. For the next batch, set DPI back to 400.
README.txt Template
Create one README.txt file inside each renamed scan folder.
Collection name:
Box name/number:
Folder name/number:
Scanned by:
Scan date:
Scanner: Bookeye
Notes:
Why PNG (Preservation Rationale)
Long-term master format
TIFF (uncompressed or lossless) is traditionally the archival gold standard. Since Bookeye cannot output TIFF at capture, we capture as PNG, a format included in the Library of Congress Recommended Formats Statement for still image works.
Next Step: Build PDFs in ABBYY FineReader
After scanning and copying the completed scan folders to DPSTORAGE, if instructed, continue with ABBYY FineReader Processing to construct the PDF files.
File-naming Guidelines
For full details, see the File/Folder Naming Guidelines.
- Avoid special characters in filenames. Use underscores and dashes instead of spaces.
- Note: The first image scanned does not include a number in its filename; the second image will end with
1.