Digital Preservation Processing
Use this workflow for item-level Community Archives digital preservation processing on Digital Preservation Lab Workstations. It covers local processing, checksums, virus scanning, verification of existing Vtext and ArchivesSpace records, BagIt packaging, ZIP verification, and final transfer to DPLAB storage.
All scripted workflow functions are available in FreeCommander under Favorite Tools. The Favorite Tools button uses the star icon.
Warning
Work from the local processing copy. Do not delete local processing files until the completed ZIP has been copied to dplab_storage/_completed_bags and the copy verification reports PASS.
Workflow Overview
| Step | Section | Purpose |
|---|---|---|
| Setup | Workflow Location | Confirm the local processing path before starting. |
| 1 | Copy Files to Local Processing | Copy the source item folder from dplab_storage to C:\DPLAB\processing. |
| 2 | Verify the Local Copy | Run copy verification and continue only if it reports PASS. |
| 3 | Run the Virus Scan | Scan the local item folder and save clam.log. |
| 4 | Create the SIP Manifest | Document the copied source-state files before reorganization. |
| 5 | Create Original File Technical Metadata | Capture original file EXIF metadata before moving files. |
| 6 | Verify Item Contents | Confirm required files, filenames, cover page, PDF metadata, and scan quality. |
| 7 | Retain Page Scan Files | Keep page scans in their source capture format unless staff identify a project-specific migration need. |
| 8 | Create the Item Finding Aid | Create and fill in finding-aid.md for the item. |
| 9 | Verify Vtext and ArchivesSpace Records | Confirm the Vtext item, ArchivesSpace record, UUID, and UUID folder already exist before preservation packaging. |
| 10 | Download Vtext Metadata XML | Download the Vtext Dublin Core XML for the item metadata folder. |
| 11 | Build the Bag Directory Structure | Create the UUID-level objects and metadata directories. |
| 12 | Move Files to the Correct Directories | Place preservation, access, and metadata files in their final pre-bag locations. |
| 13 | Create the Final Manifest | Generate manifest.csv after files are in their final directories. |
| 14 | Generate the UUID MD5 File | Create the UUID-level MD5 checksum file before BagIt packaging. |
| 15 | Create the BagIt Bag | Create and validate the BagIt package. |
| 16 | Zip the Completed Bag | Zip the validated _bag folder. |
| 17 | Update ArchivesSpace Extent with Zipped Bag Details | Add the completed ZIP details to the ArchivesSpace extent record. |
| 18 | Verify the ZIP Opens Correctly | Confirm the ZIP contains the expected top-level bag structure. |
| 19 | Copy the Completed ZIP to DPLAB Storage | Copy and verify the completed ZIP in dplab_storage/_completed_bags. |
| 20 | Mark the Source Copy Complete | Rename the source folder with _complete after successful ZIP verification. |
| 21 | Delete Local Processing Files | Delete local processing files only after the completed ZIP copy is verified. |
| Check | Completion Checklist | Confirm the final bag includes all required files and documentation. |
| Output | Expected Output | Review the expected final ZIP and bag structure. |
Workflow Location
Copy the source item folder from dplab_storage to:
C:\DPLAB\processing
Example local item folder:
C:\DPLAB\processing\ca009-007-001_quitman-high-reunions_1996
1. Copy Files to Local Processing
Copy the item folder from dplab_storage to C:\DPLAB\processing.
Work only from the local processing copy. The source copy in dplab_storage remains the fallback if processing needs to be restarted.
2. Verify the Local Copy
In FreeCommander, select the copied local item folder.
Run:
Favorite Tools > 00 Verify Copy
This produces:
copy-verification.log
Continue only if the script reports PASS. This step verifies the source files copied fully and without errors.
3. Run the Virus Scan
Select the local item folder.
Run:
Favorite Tools > 01 Virus Scan
This scans the folder and produces:
clam.log
Continue only if the scan reports no infected files.
4. Create the SIP Manifest
Select the local item folder.
Run:
Favorite Tools > 02 SIP Manifest
This produces:
sip-manifest.csv
What SIP means
SIP means Submission Information Package. In digital preservation standards, a SIP is the package of files submitted by a producer or donor to a repository so it can be reviewed, documented, and prepared for preservation. In this workflow, the SIP is the local processing copy of the original, untouched donated files before staff reorganize them, add metadata, or create the final preservation bag.
The SIP manifest documents the copied source-state files before final organization or bag creation.
5. Create Original File Technical Metadata
Select the local item folder.
Run:
Favorite Tools > 02b Capture Original Exif Metadata
This produces:
exiftool-original-metadata.csv
Create this file before moving files. It records technical metadata from the original scan files or original source image files while they are still in their source-state folder structure.
Keep exiftool-original-metadata.csv with the item metadata.
6. Verify Item Contents
Before processing, confirm that the expected files are present.
The local item folder should usually include:
- a folder of page scans
- one reduced-size access PDF
- one master PDF/A
ocr.txt(Rename OCR text file if neccessary)- metadata or supporting files, if present
For in-house Community Archives digitization, each item needs preservation and access copies in the required formats:
- page scan preservation files retained in their source capture format, such as PNG, TIFF, JPG, or JPEG
- one reduced-size access PDF
- one master PDF/A
Do not convert page scans to JP2 as a routine step. Retain PNG files as PNG files, TIFF files as TIFF files, and JPG or JPEG files as JPG or JPEG files unless staff identify a project-specific reason to migrate them. If there are more than two PDFs, keep only the required two PDF files unless staff identify a project-specific reason to retain another copy.
Also verify:
- filenames use the correct item ID
- page and order numbering are accurate
- page scans are cropped appropriately
- the access PDF cover page is attached and accurate
ocr.txtis present- both required PDF files are present
- both PDF files have embedded metadata
- the master PDF/A opens successfully in Adobe Acrobat
- Adobe Acrobat confirms the master PDF/A is a PDF/A file
- the master PDF/A has embedded metadata
- no pages are missing
- no unrelated files are present
If any expected Vtext, ArchivesSpace, cover page, or PDF metadata work is missing, return to the earlier workflow guide and complete that work before continuing.
Check the Master PDF in Acrobat
Open the master PDF in Adobe Acrobat before continuing.
Confirm:
- the master PDF opens successfully
- Acrobat shows the PDF/A compliance banner
- the file has embedded metadata in File > Properties

Check Page Scan Cropping
Review page scans before final organization. Look for wasted white space around the item content, especially small newspaper clippings, loose notes, or other small items surrounded by a large blank scan area.
If a scan has excessive blank space, crop it in Photoshop before packaging. Keep the full item visible and leave about 1/4 inch of margin around the content so it is clear the whole item is present and no edges have been cropped out.
Only crop when there is a lot of blank space. Cropping is time consuming, so do not spend time trimming scans that already have a reasonable margin. The goal is to remove obvious waste that would make preservation bags unnecessarily large over time.
Verify Filename Patterns
See the FreeCommander rename instructions if you need help applying filename patterns or counters.
PDF filenames should begin with the item ID, followed by a short item title, followed by the date when known. File and folder names should be ALL LOWERCASE and contain no spaces or special characters. See File/Folder Naming Guidelines.
The item ID string identifies the collection, series, subseries when applicable, and item number. The prefix identifies the collection area: ca means Community Archives, ms means Manuscripts for non-VSU records, and ua means University Archives for Valdosta State records. The first prefix-number pair, such as ca-013, is the collection number. The next three-digit string is the series number. The next three-digit string is the subseries number when applicable. The final number is the item number.
Example item ID:
ca-013-001-002-001
Use all lowercase. Use only letters, numbers, dashes, underscores, and the period before the file extension. Use dashes inside a string of words, such as the item title, and use underscores to separate information types.
Use this pattern:
item-id_short-title_date.pdf
The master PDF/A uses the base filename. The reduced-size access PDF usually uses the same filename with a added after the date.
Examples:
ca-013-001-002-001_hahira-gold-leaf_1973-01-04.pdf
ca-013-001-002-001_hahira-gold-leaf_1973-01-04a.pdf
If there is no date, use _nd for the master PDF/A and _nd_a for the access PDF.
Examples:
ca-013-001-002-001_hahira-gold-leaf_nd.pdf
ca-013-001-002-001_hahira-gold-leaf_nd_a.pdf
For dates:
- use ISO format
YYYY-MM-DDwhen the full date is known - use
YYYY-MMwhen only the month and year are known - use
YYYYwhen only the year is known - use
cYYYYfor circa dates, such asc1976 - use
YYYY-YYYYfor date spans - use
cYYYY-YYYYfor circa date spans - use
_ndwhen there is no date at all - for no-date access PDFs, use
_nd_a.pdf
Truncate long titles enough to keep the filename readable while preserving the main identifying words. Separate title words with dashes.
Example bag filename:
ca009-007-001_quitman-high-reunion_1996-06-08_bag.zip
Page scan filenames should use the item ID plus a page number.
Use this pattern:
item-id_p000.ext
Keep the source file extension for page scans. For Bookeye scans, this is usually .png. For JPG or JPEG source scans, keep .jpg or .jpeg.
Example page scan filenames:
ca009-007-001_p001.png
ca009-007-001_p001.jpg
7. Retain Page Scan Files
Keep page scans in their source capture format unless staff identify a project-specific migration need.
- Bookeye PNG scans may remain as
.pngfiles. - TIFF scans may remain as
.tifor.tifffiles. - JPG or JPEG scans may remain as
.jpgor.jpegfiles.
Do not create JP2 derivatives as a routine preservation-processing step. If staff explicitly require a project-specific image migration, document the decision in the finding aid or project notes and save any migration log with the item metadata.
8. Create the Item Finding Aid
Select the local item folder.
Run:
Favorite Tools > 03a Create Item Finding Aid
This produces:
finding-aid.md
Begin filling out the finding aid and continue updating it as the rest of the workflow is completed. See Creating an Item Finding Aid for the current template and field-by-field guidance.
Fill in the following fields:
- Title (at top and under description)
- Identifiers
- UUID
- Collection ID - The CA number
- Acquisition ID - Type "N/A" for not applicable.
- Item ID - Use the full item id
- Bag Filename - Final zipped folder filename. Should autopopulate on creation. Verify it is correct.
- Online Access
- Vtext URL - Add the Vtext Item Handle URL
- ArchivesSpace URL - Add URL to Archival Object item page
- ArchivesSpace Digital Object: Add the URL to the Digital Object page.
- Access PDF Download Link: Copy the PDF download URL from Vtext and paste here
- Description
- Title
- Creator
- Date
- Scope and contents
- Extent
- Total Files: Count scan pages plus 2 the two pdf files
- Total Size: Total file size of 2 PDF files and Scans folder. See Record File Sizes.
- Formats - List formats. Default is: PDF, PDF/A, PNG
- Extent Statement - 1 electronic record (PDF), and X page scans. Total File Size. E.g.
1 electronic record (PDF), and 8 page scans (PNG). 1.30 GB (1,403,526,758 bytes). - Subjects: List the subject headings in bullet list
- Rights and Access - Rights Statement: Creator/Donor, © YEAR of item. E.g.
Hahira Historical Society, © 1972 - Citation (APA Bibliography) - Add citation
- Processing notes - fill in processing notes.
Example APA-style bibliography citation:
Hahira Historical Society. (1973, January 4). The Hahira Gold Leaf (No. 51). Hahira Gold Leaf (newspapers) series, Hahira Historical Society Collection (CA-013). Valdosta State University Archives and Special Collections. https://hdl.handle.net/10428/7661
Record File Sizes
Record file sizes in the finding aid for the scan folder, access PDF, and master PDF/A.
In Windows Explorer or FreeCommander:
- Select the scan folder, access PDF, and master PDF/A.
- Right-click the selection and choose Properties.
- Copy and paste the displayed size information into
finding-aid.md.
Use the full Windows file size statement when available.
Example:
17.1 MB (17,994,854 bytes)
Finding Aid Markdown Notes
The finding aid is a Markdown file. See the Markdown Guide basic syntax tutorial for a quick reference.
For this workflow:
- wrap filenames and paths in backticks, such as
finding-aid.mdorUUID/metadata/manifest.csv - if you add a new subsection, use a third-level heading with three number signs, such as
### Processing Notes - keep notes concise and readable for staff who may need to review the file later
9. Verify Vtext and ArchivesSpace Records
Digital preservation processing assumes the earlier Community Archives workflows are already complete. Do not create the Vtext item, upload the access PDF, attach the Vtext cover page, embed PDF metadata, or create the ArchivesSpace record in this workflow.
Before packaging, verify:
- the access PDF has the Vtext cover page attached
- the access PDF has embedded PDF metadata
- the access PDF has been uploaded to Vtext and set as the primary bitstream
ocr.txthas been uploaded to the Vtext metadata bundle- the Vtext Handle URL is recorded in
finding-aid.md - the ArchivesSpace item record and digital object already exist
- the ArchivesSpace URL is recorded in
finding-aid.md - the item UUID has been generated and recorded on the Vtext cover page
- the item folder contains a folder named with the UUID
If any of these are missing, return to Add to Vtext, especially Generate UUID and Create UUID Folder, or Add to ArchivesSpace and complete those workflows before continuing.
10. Download Vtext Metadata XML
Select the item folder, UUID folder, or metadata folder.
Run:
Favorite Tools > 04 Download Vtext Metadata
Paste either the Vtext item URL or the Handle URL.
Example:
https://hdl.handle.net/10428/7696
The script downloads Dublin Core XML and saves it using the handle number.
Example output:
10428-7696.xml
Keep this file with the item metadata.
11. Build the Bag Directory Structure
Run:
Favorite Tools > 05 Build Bag Directory
This script move all files into the UUID directory, builds the bag structure and moves files to the appropiate directories:
UUID/metadata/bag-documentation.txt
Expected pre-BagIt structure:
item-folder/
+-- UUID/
    +-- objects/
    |   +-- nearline/
    |   +-- online/
    +-- metadata/
The UUID folder should already exist from the Add to Vtext UUID step. If it does not, return to that workflow and create it before continuing. If the active folder is already a UUID folder, the script creates the required subfolders inside it.
12. Move Files to the Correct Directories
Move files into the UUID folder structure.
Preservation master files:
- place page scan preservation files in
UUID/objects/nearline, keeping their source capture format such as PNG, TIFF, JPG, or JPEG - place the master PDF or PDF/A, if applicable, in
UUID/objects/nearline
Access files:
- place access PDFs in
UUID/objects/online
Metadata files:
- place metadata and documentation files in
UUID/metadata
Metadata files may include:
copy-verification.logclam.logsip-manifest.csvexiftool-original-metadata.csvmigration.log, only if a project-specific file migration was performedfinding-aid.mdvtext-cover.docx- final cover PDF
ocr.txt- Vtext XML, such as
10428-7696.xml - any other supporting metadata files
13. Create the Final Manifest
Open the UUID folder in FreeCommander and confirm it contains:
objects/
metadata/
Run:
Favorite Tools > 06 Create Manifest
This creates the final Siegfried manifest:
UUID/metadata/manifest.csv
Create this manifest only after files are in their final locations.
Verify the Master PDF/A Format
Open UUID/metadata/manifest.csv and find the row for the master PDF/A file in UUID/objects/nearline.
Confirm that the master PDF/A row has this PRONOM ID:
fmt/477
fmt/477 identifies PDF/A-1b. If the master PDF/A is missing from the final manifest, or if its PRONOM ID is not fmt/477, stop and correct the PDF/A file before continuing.
14. Generate the UUID MD5 File
In FreeCommander, select the UUID folder and press Ctrl + K.
Use these settings:
- Checksum Method:
MD5 - Store Checksums: checked
Run the checksum tool.
This produces a file named:
UUID.md5
Example:
34AF668A-2745-4EBC-AEDE-C6D7A862BB10.md5
Before BagIt runs, the .md5 file should be beside the UUID folder:
item-folder/
+-- UUID/
+-- UUID.md5
When BagIt runs, both are moved into the data folder:
item-folder/
+-- data/
    +-- UUID/
    +-- UUID.md5
15. Create the BagIt Bag
Open the top-level item folder, the UUID folder, or the UUID metadata folder in FreeCommander.
Run:
Favorite Tools > Bagit > 07a Create Bag
Do not manually add _bag to the top-level folder name before running the script. The script creates the BagIt structure, validates the bag, and appends _bag to the top-level folder name only if validation passes.
Bag-info autofill
The BagIt script looks for a Vtext XML file in the bag metadata folder. If a Vtext XML file is present, the script can autopopulate bag-info.txt with the correct values. If no Vtext XML file is present, enter the values manually when prompted. Optional fields can be skipped. At minimum, the description should include the source or collection, item name, date, and Vtext URL.
When prompted for the Bag Description, use the item citation.
Example description:
Valdosta State University. "Title," Valdosta State University Archives and Special Collections. Valdosta, Georgia. United States. Retrieved from https://hdl.handle.net/10428/####
The script creates the BagIt structure in place.
Expected final bag structure:
item-id_bag/
+-data/
+-- bagit.txt
+-- bag-info.txt
+-- manifest-sha256.txt
+-- tagmanifest-sha256.txt
+-- data/
    +-- UUID.md5
    +-- UUID/
        +-- objects/
        |   +-- nearline/
        |   +-- online/
    +-- metadata/
Run:
Favorite Tools > Bagit > 07b Verify Bag
Verify the bag after it is created and before zipping. Continue only if BagIt validation reports PASS.
If you update metadata or add or remove files after bag creation, run:
Favorite Tools > Bagit > 07c Update Bag Manifests
Run 07c Update Bag Manifests after every change to the bag. Then run 07b Verify Bag again and continue only if validation reports PASS.
16. Zip the Completed Bag
Select the completed top-level _bag folder.
Run:
Favorite Tools > 08 Zip Bag
The ZIP should contain the top-level bag folder.
Append _bag to the end of the ZIP filename.
Example:
name-of-bag_bag.zip
Expected ZIP structure:
item-id_bag.zip
+-- item-id_bag/
    +-- bagit.txt
    +-- bag-info.txt
    +-- manifest-sha256.txt
    +-- tagmanifest-sha256.txt
    +-- data/
AIP Packaging and Archive Size Limits
AIPs larger than 50 GB must be reviewed for logical subdivision.
A single compressed AIP should normally not exceed 100 GB. Packages larger than 100 GB should be divided into independently valid BagIt packages when the records can be separated logically without disrupting their archival arrangement or context.
Each divided package must have its own:
- UUID
- BagIt manifests and tag manifests
bag-info.txtmetadata- Archival description
- Recorded package checksum
Large packages that cannot reasonably be divided may remain as uncompressed BagIt directories.
Multipart ZIP archives, including .z01, .z02, and .zip.001 sets, may be used as a documented exception when:
- The AIP cannot be divided logically.
- An uncompressed Bag directory is not operationally practical.
- A single ZIP would be too large to copy, validate, retrieve, or manage reliably.
When a multipart ZIP is used:
- All parts together constitute one AIP.
- The parts must not be treated as independent AIPs.
- All parts must be retained together at every storage location.
- The split-package method and part sequence must be documented.
- A SHA-256 checksum must be recorded for each part.
- Each part must be copied using a verified-copy method.
- Each destination copy of each part must be verified.
- The complete ZIP should be reassembled and tested when practical.
- The extracted Bag should be validated when practical.
Logical subdivision into independent AIPs or storage as an uncompressed Bag is preferred over multipart ZIP packaging.
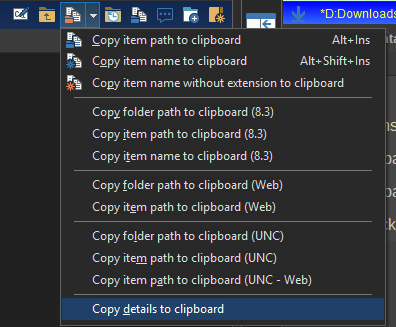
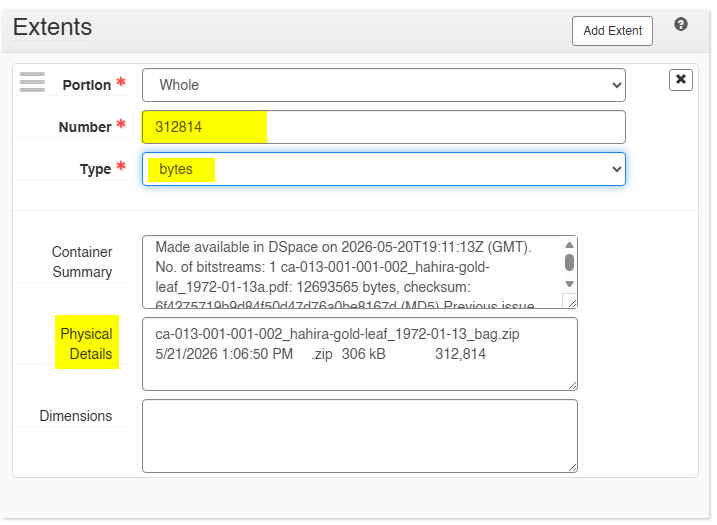
17. Update ArchivesSpace Extent with Zipped Bag Details
After the bag ZIP has been created, return to the existing ArchivesSpace item record and update the extent information with the completed ZIP package details in the "Physical Details" field.
Record the final ZIP details from:
- the completed ZIP filename
- the completed ZIP file size
- any required bag details from
bag-info.txt
In FreeCommander:
- Select the completed bag ZIP file.
- Click the red file path icon drop-down in the FreeCommander path button.
- Select Copy details to clipboard.
- Paste the copied ZIP file details into the ArchivesSpace extent record.
- Update the ArchivesSpace file size and extent information so it matches the completed bag ZIP. Use the ZIP file size in bytes and select
bytesas the extent type.
18. Verify the ZIP Opens Correctly
Open the ZIP file and confirm it contains:
- the top-level
_bagfolder bagit.txtbag-info.txtmanifest-sha256.txttagmanifest-sha256.txtdata/data/UUID/data/UUID.md5
If the ZIP opens incorrectly or does not contain the top-level bag folder, recreate the ZIP.
19. Copy the Completed ZIP to DPLAB Storage
Select the final bag ZIP file.
Run:
Favorite Tools > 09 Copy Completed Bag to DPLAB Storage
This copies the ZIP file to:
dplab_storage/_completed_bags
The script verifies the copy by file size and SHA-256 checksum.
Continue only if the script reports PASS.
Expected Output
The finished ZIP should be copied and verified in:
dplab_storage/_completed_bags
The final bag should include:
item-id_bag/
+-- bagit.txt
+-- bag-info.txt
+-- manifest-sha256.txt
+-- tagmanifest-sha256.txt
+-- data/
    +-- UUID.md5
    +-- UUID/
        +-- objects/
        |   +-- nearline/
        |   +-- online/
        +-- metadata/
            +-- manifest.csv
            +-- finding-aid.md
            +-- clam.log
Other metadata files may also be present, including copy-verification.log, sip-manifest.csv, exiftool-original-metadata.csv, migration.log if a project-specific file migration was performed, ocr.txt, vtext-cover.docx, and the downloaded Vtext XML file.
20. Mark the Source Copy Complete
After the final ZIP has been copied to dplab_storage/_completed_bags and copy verification reports PASS, rename the original source item folder in %DPLAB_STORAGE% so it ends with:
_complete
Example:
ca009-007-001_quitman-high-reunions_1996_complete
This marks the source copy as processed and ready for staff quality control review. After staff confirm the final bag is complete and backed up, the _complete source copy may be deleted by staff.
Do not rename the source copy if:
- the completed ZIP copy verification failed
- the completed ZIP is missing from
dplab_storage/_completed_bags - the final bag still needs quality control review or correction
- staff have not confirmed that the source copy can be removed
21. Delete Local Processing Files
If the completed ZIP copy verification reports PASS, the local processing files may be deleted.
Do not delete local files if:
- the ZIP copy verification failed
- the completed ZIP is missing from
dplab_storage/_completed_bags - additional edits are still needed
Staff-Only Final Preservation Storage
This section is for Archives staff only. Student workers should stop after the completed ZIP has been copied and verified in dplab_storage/_completed_bags, unless staff give different instructions.
After staff quality control is complete, the completed bag ZIP must be copied or uploaded to:
- Amazon Glacier
- ArchBak external hard drive
- Dark Archives storage
After the storage copies are complete, add the completed bag to the Microsoft Access Bag Database:
V:\librarydata\archives_store\admin\Databases and Indexes\BagDatabase\BagDatabase.accdb
After the completed bag is backed up to all required preservation storage locations and recorded in the Bag Database, remove duplicate or unprocessed copies that no longer need to remain on local or working storage.
Delete only after confirming the preservation storage copies and Bag Database entry are complete:
- the completed ZIP from
dplab_storage/_completed_bags - duplicate bag ZIP copies in temporary or working locations
- duplicate source or working folders in
DPLAB_STORAGE - unprocessed or leftover local processing files
Do not delete anything if staff quality control is incomplete, if any preservation storage copy is missing, or if the Bag Database entry has not been created.
Completion Checklist
Before considering the item complete, confirm the final bag includes:
bagit.txtbag-info.txtmanifest-sha256.txttagmanifest-sha256.txtdata/data/UUID/data/UUID.md5data/UUID/objects/nearline/data/UUID/objects/online/data/UUID/metadata/data/UUID/metadata/manifest.csvdata/UUID/metadata/finding-aid.mddata/UUID/metadata/clam.log- the master PDF/A appears in
data/UUID/metadata/manifest.csvwith PRONOM IDfmt/477 - ArchivesSpace extent record has been updated with the completed ZIP details
Also confirm, if applicable:
data/UUID/metadata/copy-verification.logdata/UUID/metadata/sip-manifest.csvdata/UUID/metadata/exiftool-original-metadata.csvdata/UUID/metadata/migration.log, only if a project-specific file migration was performeddata/UUID/metadata/ocr.txtdata/UUID/metadata/vtext-cover.docxdata/UUID/metadata/[handle].xml
The final ZIP must be copied and verified in dplab_storage/_completed_bags.
Staff-only final storage:
- completed bag ZIP has been copied or uploaded to Amazon Glacier
- completed bag ZIP has been copied to the ArchBak external hard drive
- completed bag ZIP has been copied to Dark Archives storage
- completed bag has been added to the Microsoft Access Bag Database
- duplicate completed bag ZIPs and unprocessed working copies have been removed after preservation storage backup is complete