2. File Organization
Use this guide while scanning records to organize the digital files so they match the physical arrangement of the original records.
Workflow Overview
| Step | Section | Purpose |
|---|---|---|
| 1 | Folder Structure | Recreate the collection, box, physical folder, and item hierarchy in the local processing directory. |
| 2 | Create a README File | Add readme.txt to each item folder and record the item, location, and scanning details. |
| 3 | Page Scan Filenames | Confirm the correct item ID pattern and page-number format before renaming scans. |
| 4 | Rename Page Scans with FreeCommander | Use FreeCommander Multi-Rename to apply the item ID and page counter to scan filenames. |
| Reference | Community Archives Collection Numbers | Check collection numbers and related repository links when building item IDs. |
| Check | Before Moving On | Confirm the item folder, README, scan order, and filenames are ready before moving files. |
| 5 | Move Files to DPLAB Storage | Move the organized collection or series hierarchy to DPLAB_STORAGE. |
Folder Structure
Save the files in your local processing directory:
C:\DPLAB\processing
Recreate the physical organization of the original records as folder directories. Build the directory hierarchy in this order:
-
Collection or series: Create one top-level folder for the entire collection or series being scanned. Begin the name with the local call number followed by an underscore.
ca-017_first-presbyterian-church ca-013-001_hahira-historical-society_gold-leaf -
Box: Inside the collection or series folder, create one subfolder for each physical box. Use
bas the box abbreviation and a two-digit box number.ca-017_b01 ca-013-001_b01 -
Physical folder: Inside each box folder, create one subfolder for each physical folder. Use
fand a three-digit folder number, then add a shortened version of the folder title.ca-017_b01-f001_constitutions-bylaws ca-017_b01-f002_budgets-1977 -
Item: Inside each physical folder directory, create one subfolder for each item. Use an incrementing three-digit item number followed by a shortened item title.
b01-f001-001_item-title
b01-f001-002_item-title
Filename rules
Use only lowercase letters, numbers, hyphens, and underscores in folder and file names. Do not use spaces or other special characters. Use hyphens between words and underscores to separate major parts of a name.
Inside each item folder, create a folder named:
scans
After creating scans, move all page scan image files into that folder.
Example complete hierarchy:
ca-017_first-presbyterian-church/
+-- ca-017_b01/
    +-- ca-017_b01-f001_constitutions-bylaws/
        +-- b01-f001-001_item-title/
            +-- readme.txt
            +-- scans/
                +-- item-id_p001.png
                +-- item-id_p002.png
Create a README File
Create a plain-text file named readme.txt in each item folder so future staff can identify the item and understand where it belongs.
Include:
- the full item name
- the physical location, including collection or series, box, and folder information
- the scanning date
- your name
- any additional notes needed to understand the folder's contents
Use this basic format:
Item name:
Location:
Scanning date:
Scanned by:
Notes:
After creating readme.txt, confirm that the item folder includes both readme.txt and the scans directory.
Page Scan Filenames
For textual documents, page filenames should include:
- Community Archives collection number
- series number
- subseries number, if applicable
- any additional sub-subseries numbers, if applicable
- item number
- page number
Use this pattern:
item-id_p###.png
Examples:
ca-001-001-001_p001.png
ca-001-001-001_p002.png
ca-001-001-001_p003.png
If the item belongs to a subseries, include that number in the item ID:
ca-001-001-002-001_p001.png
ca-001-001-002-001_p002.png
Ask before guessing
If you are unsure which collection, series, subseries, or item number to use, stop and ask Archives staff.
Rename Page Scans with FreeCommander
Use the FreeCommander Multi-Rename tool to rename page scans quickly.
- Open the item folder in FreeCommander.
- Open the
scansfolder. - Sort the scans in page order.
- Make sure the first page scan is at the top of the rename list.
- Select the scan files.
- Press
F2to open Multi-Rename. - Replace the original filename pattern
[n]with the item id string + "p[c]" to add a page number counter.
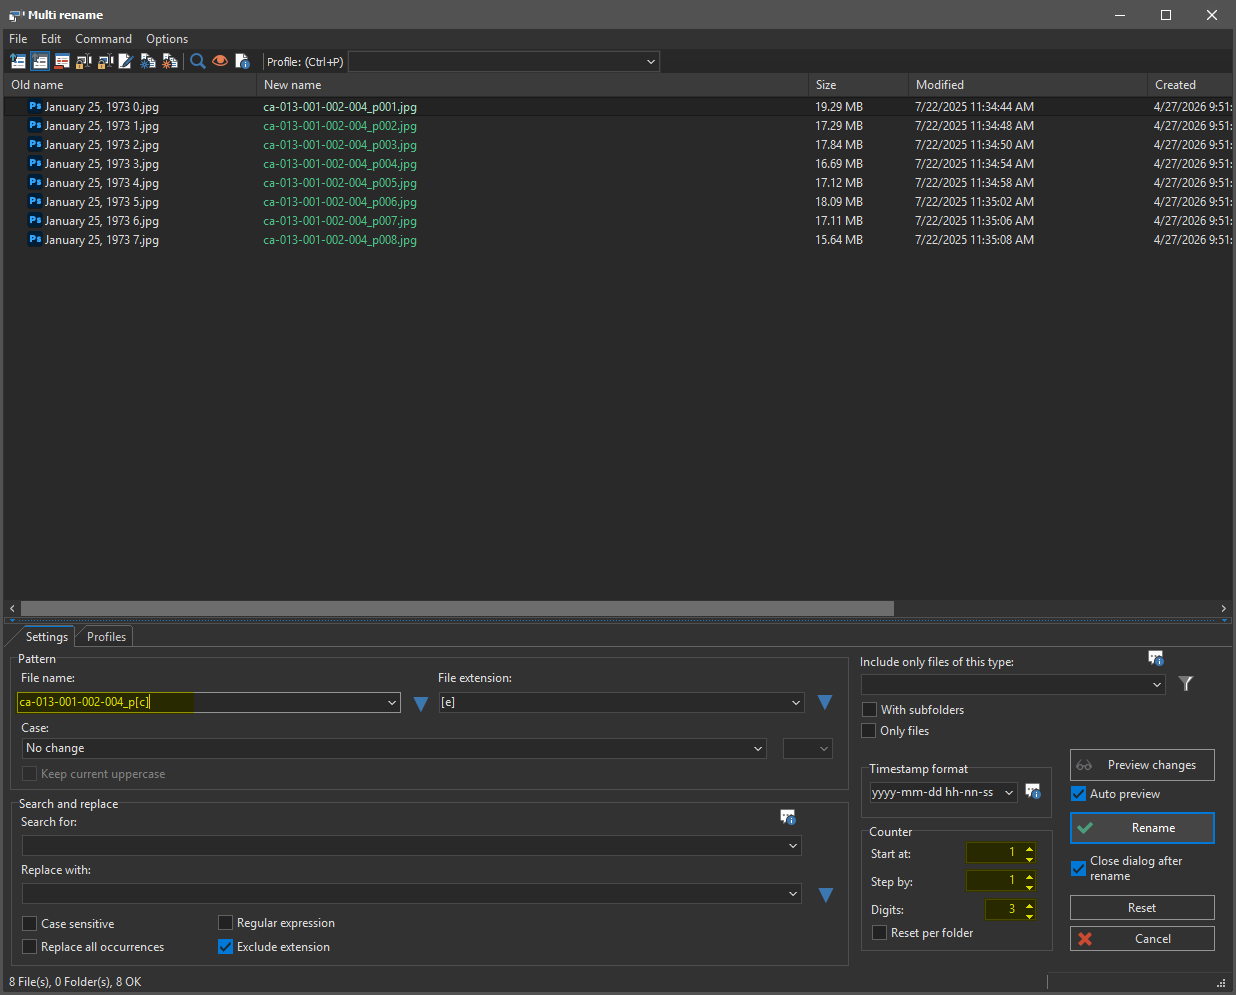
Example FreeCommander rename string:
ca-001-001-001_p[c].png
The counter [c] creates the page numbers:
ca-001-001-001_p001.png
ca-001-001-001_p002.png
ca-001-001-001_p003.png
Check the first page
The Bookeye often saves the first page as KIC.png and the second page as KIC_01.png. Make sure KIC.png is at the top of the rename list so it becomes p001.
Community Archives Collection Numbers
Community Archives collection numbers can be checked in Vtext:
Community Archives Projects in Vtext
| CA Number | Collection |
|---|---|
| CA-001 | Lowndes County Historical Society |
| CA-002 | Grady County Historical Society |
| CA-003 | Thomasville History Center Collection |
| CA-004 | Houseal Collection |
| CA-005 | Bennett Collection |
| CA-006 | Valdosta Project Change |
| CA-007 | Turner Center for the Arts |
| CA-008 | Macedonia Community |
| CA-009 | Quitman Brooks County Museum and Cultural Center |
| CA-010 | Brooks County Historical Board |
| CA-011 | Mitchell County Genealogical Society |
| CA-012 | Berrien County Historical Foundation |
| CA-013 | Hahira Historical Society |
| CA-014 | Ray City Community Library Collection |
| CA-015 | River Hill Baptist Church Collection |
| CA-016 | Worth County Historical Society |
| CA-017 | First Presbyterian Church-Warner Robins, GA |
| CA-018 | Cook County Historical Society |
| CA-019 | Valdosta-Lowndes Chamber of Commerce Collection |
For series and subseries numbers, check ArchivesSpace Community Archives Repository.
Before Moving On
Before continuing to ABBYY FineReader processing, confirm:
- the digital directory hierarchy matches the physical collection, box, folder, and item arrangement
- the collection or series hierarchy is saved under
C:\DPLAB\processing - all folder and file names use only lowercase letters, numbers, hyphens, and underscores
- each item folder has a
scansdirectory - all page scans are inside
scans - page scans are in correct order
- page filenames begin with the correct CA item ID
- page numbers start at
p001 readme.txthas been created and filled out in each item folder- no later workflow files have been added yet
Move Files to DPLAB Storage
After the folder hierarchy and page scan filenames are correct, move the completed collection or series folder to DPLAB_STORAGE:
V:\librarydata\archives_store\dplab_storage
Keep the top-level folder naming pattern created in the local processing directory:
call-number_collection-name_series-name
Example:
ca-013_hahira-historical-society_gold-leaf
Move the completed collection or series folder from C:\DPLAB\processing to DPLAB_STORAGE without flattening or changing its internal hierarchy.
After the move is successful, confirm that the collection, box, physical folder, item, readme.txt, and scans directories are present in DPLAB_STORAGE.
Next Step
After the organized files have been moved to DPLAB_STORAGE, the next workflow step is ABBYY FineReader Processing.
Scanning and file organization may be the only steps assigned to a particular student worker. The same student may continue to ABBYY FineReader processing, or another student may pick up the item later using the organized files and readme.txt.